

Introducer Sheath Factory: Inside Advanced Medical Device Manufacturing
2026-09-28
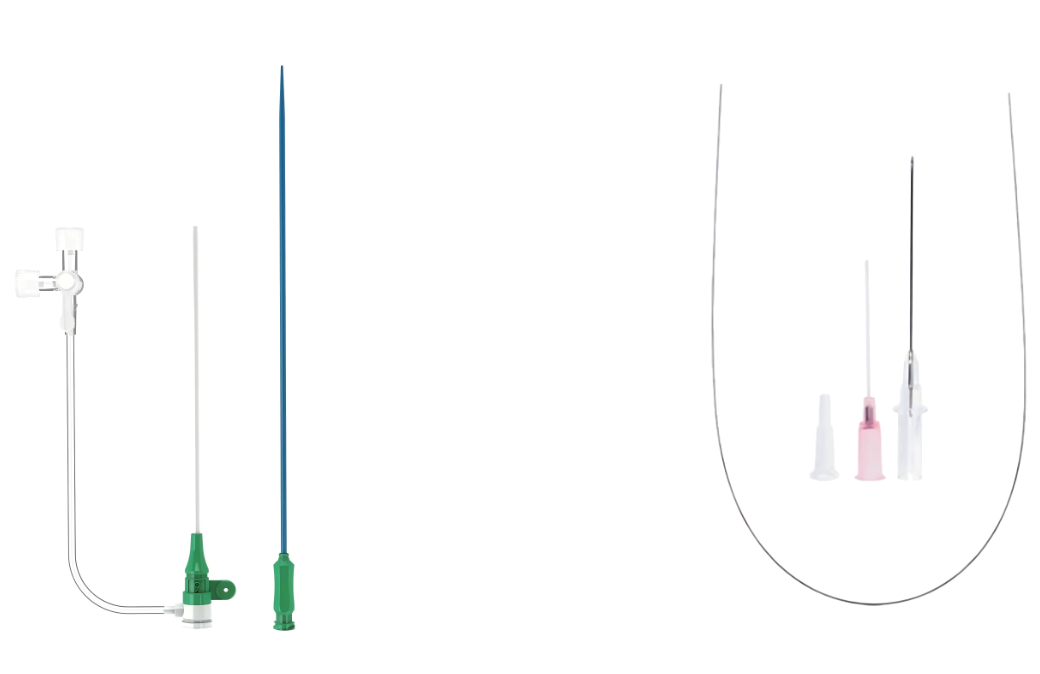
Most people never see what goes into a flawless introducer sheath procedure. But inside INT's manufacturing plant, every micron matters. From raw polymer extrusion to laser-tipped finishing, this is where precision stops being a buzzword and starts being a physical reality. In this post, we'll walk you through the cleanrooms, the testing rigs, and the quiet innovations that keep interventional teams reaching for this exact brand when the margin for error is zero.
Why Moisture Control Precedes Every Extrusion Run
Moisture hides inside resin pellets long before they reach the feed throat. During storage and transport, hygroscopic polymers soak up ambient humidity, and that water doesn't rinse away at the hopper. Once the material enters the barrel, barrel heat flashes the trapped moisture into steam. Inside the melt, those steam pockets expand and tear through the polymer stream, leaving surface splay, internal voids, or even audible popping at the die. With materials like nylon or polycarbonate, the damage goes deeper: hot water attacks the polymer backbone through hydrolysis, permanently lowering molecular weight and part strength.
Drying has to happen before extrusion because no downstream mixing or pressure can remove what has already vaporized inside the melt. Desiccant dryers and hopper dryers work by driving moisture out of the pellet core over time, not by wiping the surface. Operators watch dew point, airflow, and residence time to confirm the resin has reached a stable low-moisture level. Cut that step short and the consequences rarely show up immediately—sometimes it's a half-mil dimension shift, sometimes a brittle part that fails a week after installation, sometimes a screw full of degraded gel that takes an afternoon to purge.
Regrind and colorants often carry their own moisture load, so they can reintroduce water even when virgin pellets are bone dry. Good extrusion setups treat every ingredient at the feed throat as part of the same moisture budget. Controlling water before the run isn't just about avoiding bubbles; it's about protecting the melt from chemical breakdown and saving the line from quality problems that no amount of downstream inspection can fully reverse.
Extrusion Line Tolerances That Rival Semiconductor Fabs
Most extrusion shops still talk tolerances in thousandths of an inch, but a handful of lines now hold profiles to single-digit micron drift across an entire production run. That’s the same territory occupied by wafer steppers and lithography tracks—where a half-degree thermal swing or a 2-micron die shift can scrap a batch. On these extruders, the melt pump, gearbox backlash, and barrel temperature zones are tuned so tightly that the polymer exits the die with less variation than the thickness of a human hair split thirty ways.
The comparison isn’t marketing fluff. Medical catheter liners, microfluidic channels, and fiber optic buffer tubes now demand wall thicknesses that stay within ±3 microns over kilometers of continuous length. Achieving that means laser micrometers sampling at 4,000 times per second, closed-loop haul-off speed adjustments every 50 milliseconds, and air rings designed with computational fluid dynamics rather than guesswork. Some facilities even run the extrusion line inside a positive-pressure cleanroom with HEPA filtration, mirroring the fab environment where a single dust particle can ruin a reticle. Operators wear bunny suits not for show, but because a stray eyelash in the melt stream becomes a visible defect under the same inspection microscopes used for chip bumps.
What separates these lines from conventional extrusion isn’t one magic component—it’s the refusal to treat any variable as “close enough.” Screw rpm is held to ±0.1% of setpoint, melt temperature to ±0.3°C, and downstream tension to within a few grams. Every parameter gets logged at millisecond intervals and correlated against post-process metrology, creating a feedback loop that would look familiar to a process engineer chasing Cpk values on a 300mm wafer line. The result is a product that doesn’t just meet a drawing tolerance—it hits the same statistical process control benchmarks that semiconductor fabs use to qualify a tool for production.
Cleanroom Assembly: A Single Particle Can Scrap a Lot
A speck far smaller than visible dust can turn a wafer or optical sensor into scrap. In cleanroom assembly, a 0.5-micron particle landing on a photomask, lens, or bond pad doesn't just spoil one unit—it replicates the defect across every device processed afterward. Because most assembly steps are sequential and tightly clustered, a single contamination event can push a lot's yield from acceptable to unusable within minutes. Operators often don't see the particle itself; they see the pattern of failures it leaves behind.
People, not equipment, remain the dominant source of particles. Gowns, hoods, and gloves slow the shedding but never stop it. A quick reach across an open cassette, a sleeve brushing a workstation edge, or even the static charge on a freshly cleaned surface can transfer enough material to create a killer defect. The most effective controls are behavioral: moving deliberately, staging tools so hands never pass over exposed product, and treating every surface as a potential particle reservoir until proven otherwise.
Scrapping a contaminated lot carries costs far beyond raw materials. Rework, requalification, and rescheduling ripple through the production line, and in low-volume, high-complexity assembly one lost lot can represent days of capacity. That is why many lines now use continuous particle monitoring with automatic holds when counts spike. The smallest thing in the cleanroom often drives the largest financial consequence.
Laser Measurement Keeps Wall Thickness Honest
Thin-wall tubing often hides its flaws until it's too late. A laser gauge doesn't wait for failure—it scans the wall in real time, catching drift the moment it happens. Operators see actual thickness, not a guessed average, so they can adjust before scrap piles up. This kind of direct feedback takes the guesswork out of extrusion and drawing lines, where heat and speed constantly push material out of spec.
What makes the laser approach stand out is how it handles uneven surfaces. Slight vibration or die wear can create a wall that varies by a few thousandths of an inch, and contact gauges tend to smooth over those differences. Laser measurement bounces light off the surface without touching it, mapping both the outer profile and inner bore simultaneously. The result is a true cross-section, not a single point reading that might miss a thin spot hidden under scale or coolant.
In practice, the system becomes the line's conscience. A display shows the wall thickness live, with tolerance bands clearly marked. When the beam detects a low spot, an alert tells the operator to tweak the puller speed or die centering. That honesty matters in medical tubing, automotive fuel lines, and anywhere a burst or leak could be costly. The laser doesn't care about the previous shift's numbers—it only reports what's in front of it right now, keeping every foot of product within the range that engineering actually specified.
Custom Tip Forming for Tortuous Anatomy
When a guidewire meets a tight bend, the tip has to read the vessel wall like a blind hand tracing a curve. Custom tip forming means shaping that distal segment not just to a generic angle, but to the specific radius and resistance of the tortuous path ahead. We bend, taper, and micro-grind until the transition from stiff shaft to soft tip feels less like a hinge and more like a continuation of the wire's intent.
The real challenge isn't making the curve—it's making the curve hold without memory loss or spring-back when the anatomy pushes against it. We use staged thermal setting and manual verification under magnification, checking each tip against a template of the target anatomy. That way, the formed tip doesn't just look right on the bench; it tracks through a simulated loop with the same predictability as a straight vessel segment.
This level of customization matters most when off-the-shelf shapes force the operator to torque harder or exchange wires mid-case. A tip that was formed for the patient's own tortuosity reduces the need for redundant maneuvers and keeps the wire where it belongs—following the lumen, not fighting it.
The Sterile Packaging Gauntlet Before the OR
Before a sterile package ever crosses the threshold of an operating room, it endures a silent obstacle course. It may be jostled on carts, stacked under heavier trays, or pressed against the edges of storage shelving. Temperature swings from warehouse to hospital corridor can cause condensation to form inside the wrap, weakening the barrier without leaving a visible mark. Even a small tear along a seam or a scuffed corner from repeated handling can turn a supposedly sterile device into a vector for contamination.
The real test comes in the final minutes before surgery, when circulating nurses and surgical techs inspect each package under bright lights. They look for broken seals, punctures, moisture stains, or any sign that the package has been dropped. Yet some damage hides beneath the surface—microscopic cracks in rigid containers, fiber tears in nonwoven wraps, or adhesive failures on pouches that only reveal themselves after the package is opened. That uncertainty forces staff to treat every package as guilty until proven intact.
This gauntlet is not just about catching visible flaws; it’s about respecting the boundary between clean and contaminated. A single compromised wrap can delay a case, force an emergency re-sterilization, or, in the worst scenario, introduce pathogens to an open surgical site. The packaging itself becomes the last line of defense, and the people who handle it must read subtle cues—a slight ripple, a faint stain, a dull sound when the package is tapped—to decide whether it is safe to pass through the OR doors.
FAQ
For introducer sheath assembly, ISO Class 7 (or Class 10,000) cleanrooms are typically the baseline, but many advanced factories push to ISO Class 5 or better near critical bonding and coating stations. The impact is significant: lower particle counts reduce the risk of embolic debris on the sheath surface, which could cause thrombus formation after insertion. We use continuous particle monitoring and unidirectional airflow to keep viable and non-viable counts well below regulatory ceilings.
We run a fully automated dip-coating line with real-time viscosity and temperature control in the coating solution. After curing, each lot is tested on a friction tester that measures gram-force during simulated vascular insertion. Any deviation beyond ±5% from the target curve triggers a root-cause investigation before release. We also keep retention samples from every coating run for six months.
Adhesive can degrade under repeated sterilization cycles or in the presence of blood, risking band migration. We use a pulsed Nd:YAG laser to weld the platinum-iridium marker onto the polymer jacket without penetrating the inner liner. The weld penetration is controlled to within 0.05 mm, and every sheath undergoes X-ray inspection to confirm band alignment and absence of micro-cracks.
The braid angle—measured between the wire and the sheath axis—determines the trade-off between flexibility and hoop strength. For a sheath that must navigate tortuous iliac anatomy, we use a 45-degree braid on the distal segment and a lower angle on the proximal shaft to handle torque. A too-steep angle makes the sheath stiff and prone to vessel trauma, while too shallow causes flattening under negative pressure during aspiration.
We perform a 'worst-case device compatibility' test: a 0.035-inch guidewire with a deliberately roughened tip is passed through the sheath 50 times in a tortuous fixture at body temperature. Then the inner lumen is inspected using scanning electron microscopy for scratches deeper than 5 microns. Additionally, we measure push force using a calibrated load cell, and the maximum insertion force must stay under 0.5 N.
Single-layer extrusion is simpler but compromises between stiffness, lubricity, and burst pressure. Multi-layer coextrusion lets us use a low-friction inner layer (like PTFE or HDPE), a middle tie layer for bonding, and an outer layer of Pebax or nylon for strength and shaping. The challenge is maintaining concentricity across all layers—our line uses ultrasonic thickness gauges every 10 cm to keep wall thickness variation under 0.02 mm, otherwise you get weak spots that can kink or rupture.
The tray cavity is designed with a 3D-printed mock sheath to simulate worst-case tip contact. We then subject packaged units to ISTA 3A transport simulation, including random vibration and drop tests. After testing, every tip is examined under 20x magnification for burrs or deformation. We also add a soft silicone tip protector that is removed by the physician, not by the packaging itself, which eliminates shear forces during extraction.
We perform a 100% functional test where the valve is pressurized with saline at 300 mmHg for 30 seconds while a 0.035-inch guidewire is in place. The acceptable leak rate is less than 0.1 mL per minute. Beyond that, we run a separate test with the wire removed to ensure the valve seals completely against back-bleeding. Any unit showing a pressure drop beyond tolerance is automatically rejected and sent for failure analysis.
Conclusion
Inside an introducer sheath plant, production starts long before polymer ever reaches the extruder. Each resin lot is conditioned and dried to a strict moisture specification because trapped water vapor turns into microscopic voids and causes dimensional drift in the tubing wall. The extrusion line itself runs to tolerances measured in single-digit microns—process control that rivals what you would see in a semiconductor fab—and in-line laser gauges check wall thickness continuously from start to finish rather than relying on a few downstream samples. After extrusion, the cleanroom assembly step takes over, where a single stray particle or fiber can force an entire batch into rejection, so operators follow strict gowning and particulate monitoring protocols at every station.
Tip forming is where the sheath must match real anatomy, not just a drawing. Custom mandrels and heated dies shape distal ends for tortuous vessels, with bend radius, taper length, and softness tuned to the specific clinical use. Finally, each device faces the packaging gauntlet before it ever reaches the OR: pouches and trays are sealed under controlled temperature and pressure, then put through vacuum leak tests, burst checks, and accelerated aging studies to confirm sterility durability. That final barrier is what lets a surgeon tear open a package months later and trust that the introducer sheath will perform first time inside a patient.
Contact Us
Contact Person: Jeffrey
Email: [email protected]
Tel/WhatsApp: 86-0633-2230056
Website: https://www.sd-intmedical.com